Initialization in Swift
Initialization is the process of preparing an instance of a class, structure, or enumeration for use. This includes setting initial values for properties and performing any necessary setup.
In Swift, initializers are special methods invoked to prepare an instance. Unlike Objective-C, Swift initializers don’t return a value. Their main purpose is to ensure instances are correctly initialized.
A simple initializer in Swift looks like this:
|
1 2 3 |
init() { // perform some initialization here } |
Class instances can also have a deinitializer to perform cleanup before deallocation.
Designated Initializers
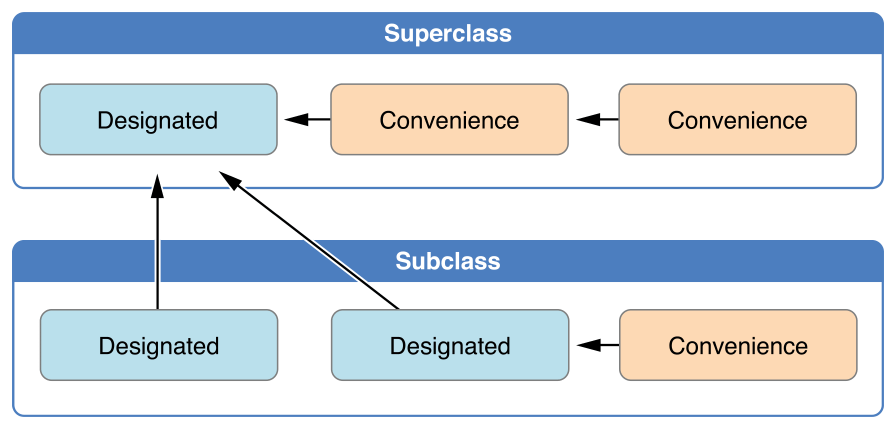
Image Source Ref#: J (originally from Apple Docs)
- Designated initializers are the primary initializers for a class
- They have to fully initialize all the properties introduced by that class
- They must also call a designated initializer from their immediate superclass (then up the chain of classes)
- Classes will typically have one designated initializer, but can easily have more
- Every class must have at least one designated initializer.
- The chain of delegating initializers will end by a call to a non-delegating initializer
In some cases, this requirement is satisfied by inheriting one or more designated initializers from a superclass because of Automatic Initializer Inheritance.
Designated initializers for classes are written in the same way as simple initializers for value types.
Syntax
So these are the inits we all used to seeing in our Swift code, such as:
|
1 2 3 4 5 |
init(sender: String, recipient: String) { self.sender = sender self.recipient = recipient super.init() } |
OR
|
1 2 3 4 5 6 7 |
init(delegate: ABCLocationManagerDelegate?) { // A designated initializer must call a designated initializer // from its immediate superclass: super.init() self.delegate = delegate self.configureLocationManager() } |
Or if with our ViewControllers
|
1 2 3 4 5 6 7 8 9 10 11 12 13 |
// MARK:- Custom initializers for our view controller to allow for // dependency injection of our services init(networking: OURNetworking, menu: SubLevelMenu) { self.networking = networking self.subMenu = menu super.init(nibName: nil, bundle: nil) self.doSomethingWithOurProductAndMenuInfo() } required init?(coder aDecoder: NSCoder) { fatalError("init(coder:) has not been implemented") } |
Convenience Initializers
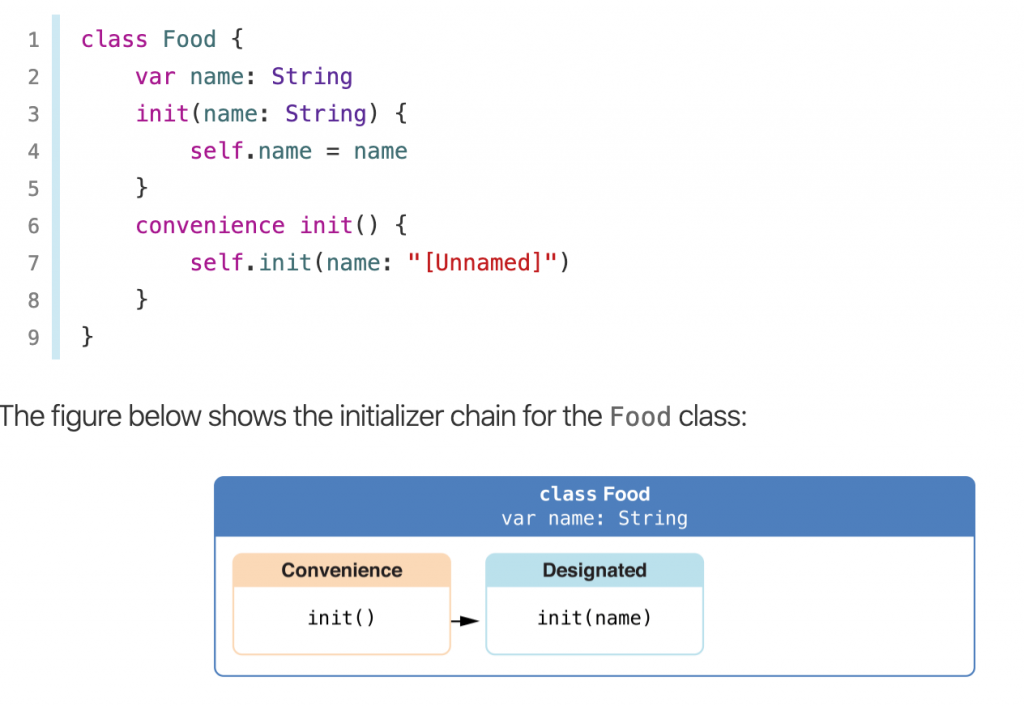
Convenience initializers serve as secondary or supporting initializers for a class. While not mandatory, they enhance flexibility and can simplify the process of instance creation. Here’s what you need to know:
- Purpose: They are shortcuts for common initialization patterns, making it easier to initialize objects for specific use-cases.
- Designation: Use the
conveniencekeyword before theinitmethod to define one. - Requirement: They must call a designated initializer from the same class.
- Advantage: While optional, they expand your options, allowing for more versatile and readable initializations.
For example, if you often create an instance with a particular set of default values, a convenience initializer can encapsulate those defaults, reducing repetitive code.
Syntax
|
1 2 3 |
convenience init(parameters) { statements } |
Basic Example
|
1 2 3 4 5 6 7 8 9 10 11 12 13 14 15 16 17 18 19 |
class Television { var make : String var sizeInInches : Int // This is the designated initializer of the class Television init(make : String, diameter: Int) { self.make = make self.sizeInInches = diameter } // This is a convenience init allowing us to generate a Television without giving it any params convenience init() { self.init(make: "LG", diameter: 27) } } var tv = Television() print(tv.make) // LG print("\(tv.sizeInInches)\"") // 27" |
Real-World Example
|
1 2 3 4 5 6 7 8 9 10 11 12 13 14 15 16 17 18 19 20 |
// If we extend UIColor, we could add a convenience initializer // therefore allowing us to generate a Color with a hex string convenience init(hexString: String) { let hex = hexString.trimmingCharacters(in: CharacterSet.alphanumerics.inverted) var int = UInt32() Scanner(string: hex).scanHexInt32(&int) let alpha, red, green, blue: UInt32 switch hex.count { case 3: // RGB (12-bit) (alpha, red, green, blue) = (255, (int >> 8) * 17, (int >> 4 & 0xF) * 17, (int & 0xF) * 17) case 6: // RGB (24-bit) (alpha, red, green, blue) = (255, int >> 16, int >> 8 & 0xFF, int & 0xFF) case 8: // ARGB (32-bit) (alpha, red, green, blue) = (int >> 24, int >> 16 & 0xFF, int >> 8 & 0xFF, int & 0xFF) default: (alpha, red, green, blue) = (255, 0, 0, 0) } //So here is where we call a Designated Initializer of UIColor (having converted into a format it can understand) self.init(red: CGFloat(red) / 255, green: CGFloat(green) / 255, blue: CGFloat(blue) / 255, alpha: CGFloat(alpha) / 255) } |
This from the Apple Docs is another good demonstration:

Recap on Initializers in Swift
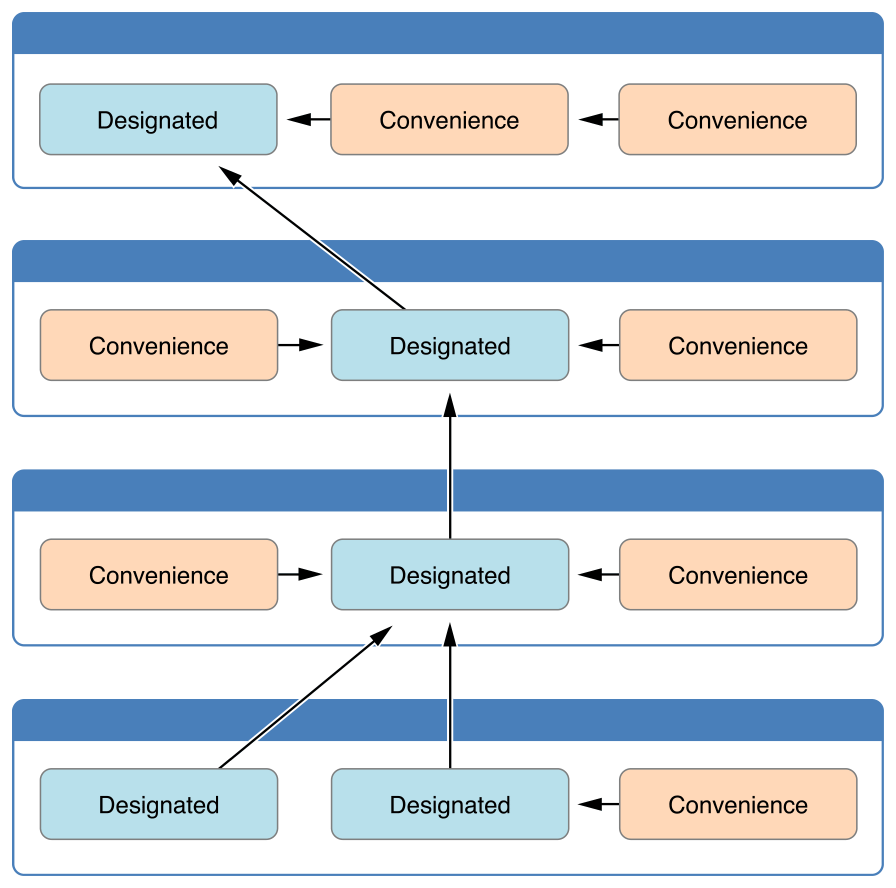
- Designated Initializers: Must call a designated initializer from its immediate superclass.
- Convenience Initializers:
- Must call another initializer from the same class.
- Ultimately, they should lead to a designated initializer being called.
Automatic Initializer Inheritance
Not all superclass initializers are inherited by subclasses. However, there are specific conditions under which this inheritance occurs automatically:
- Rule 1: If a subclass doesn’t define any designated initializers and provides default values for any new properties it introduces, it will inherit all of its superclass’s designated initializers.
- Rule 2: If a subclass provides implementations for all of its superclass’s designated initializers (either by inheriting as per Rule 1 or by defining custom implementations), it will also inherit all of the superclass’s convenience initializers.
MORE INFORMATION ON INITIALIZERS
Throwable Initializers
Using Error Handling we are able to make a Struct(or a class) initializer into a so-called throwable initializer.
Example Error Handling enum:
|
1 2 3 |
enum ValidationError: Error { case invalid } |
You can use Error Handling enum to check the parameter for the Struct(or class) meet expected requirement
|
1 2 3 4 5 6 7 8 9 10 11 12 13 14 15 16 17 18 19 20 |
struct Student { // The matriculation number is actually a string let matriculationNumber: String init(name: String?) throws { guard let name = name else { ValidationError.invalid } self.name = name } } // Now, you can use the throwable initializer using the do-try-catch syntax // like this: do { let student = try Student(matriculationNumber: "04911506") // success } catch ValidationError.invalid { // handle error } |
Source: Swift Notes for Professionals
Required Initializers
Writing the keyword required before the initializer tells us that each subclass must implement that initializer. Furthermore, using this means required modifier must be present at the respective subclass implementations as well.
This is exactly why we need this bit of code when were using initializer dependency injection as in the above example:
|
1 2 3 |
required init?(coder aDecoder: NSCoder) { fatalError("init(coder:) has not been implemented") } |
For a more comprehensive breakdown, an ok reference is found here: https://docs.swift.org/swift-book/LanguageGuide/Initialization.html
Some Syntactic Sugar
|
1 2 3 4 5 6 7 8 9 10 11 12 13 14 15 16 17 18 19 20 21 22 23 |
import UIKit enum Gender { case male case female } class Human { var age: Int? var gender: Gender? // We can pop in some underscrores like this to negate the need to // name the parameters upon initialization. init(_ age: Int,_ gender: Gender) { self.age = age self.gender = gender } } // Thus we can have (from the context of initialization) let dave = Human(40, .male) let clara = Human(22, .female) |
Further Illustration (Source: Apple Docs)

References
A: https://docs.swift.org/swift-book/LanguageGuide/Initialization.html
B: https://useyourloaf.com/blog/adding-swift-convenience-initializers/
C: https://www.raywenderlich.com/1220-swift-tutorial-initialization-in-depth-part-1-2
D: https://www.raywenderlich.com/1219-swift-tutorial-initialization-in-depth-part-2-2
E: https://www.tutorialspoint.com/swift/swift_initialization
F: https://www.journaldev.com/16889/swift-init
G: https://docstore.mik.ua/orelly/java-ent/jnut/ch03_02.htm
H: https://www.programiz.com/kotlin-programming/constructors
I: https://www.tutorialsteacher.com/csharp/csharp-object-initializer
J: Swift Notes for Professionals
![]()

Comments